This modification also applies to these Epson models:

  • C79
  • C90, C91, C92
  • D78
  • D92
  • S20, S21
  • T10, T11
  • T20, T21, T23, T26, T27


The case design and general build approach for the D92 has been used in a lot of the new cheaper printers as well so this guide will be useful for a number of different models beyond those specified above.

As you will see this printer doesn’t have the easy trapdoor access hatch you find in more expensive models but if you take your time you will find it’s simple enough.

Please Note: I have tried to make this guide more photo based so those who are not English speakers find it easier to use and understand.
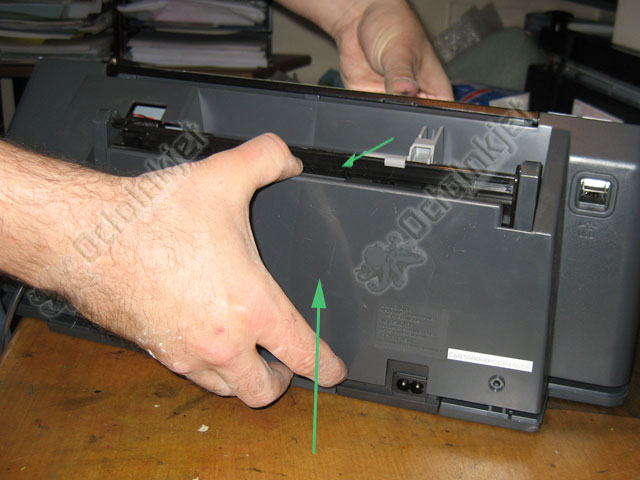
 

D92 : Back of printer

Releasing & Removing the Case

This requires a lot of patience to release different tabs and clips without breaking them and will probably require you to step back, take a break and then try again. Persevere, you will win 🙂

  • Unscrew and remove the 2 screws shown.
D92 : Release the first side panel tab
  • Release the tab on one side down and lever out using a flat head screwdriver (or similar)
D92 : Release the tab in the back panel
  • While you still hold the released side out, press the tab indicated by the error.
    Hint: This will make it easier to lift the side panel you’ve already released so it doesn’t clip back in
D92 : Push the back of the case up slightly
  • Gently lever the back of the printer up a little and release the remaining side tab
D92 : Lever up the printer case
  • With the back and side tabs released you can now start to lever up the case
D92 : Manipulate tabs behind paper feed to ease case past
D92 : Manipulate tabs behind paper feed to ease case past (alt view)
  • Just behind the paper feed that are four tabs that have to be eased past to release the case top
    Tip: Don’t be too afraid of bending these but try not to break them
D92 : Release case further
D92 : Release front tabs
D92 : Case lifted off
  • Once you are past the rear tabs it’s relatively easy to pivot the case up and forwards to release the front tabs
D92 : Locating the waste tube

The Waste tube Modification

  • Now that you have the case off you can see the waste tube
D92 : Release waste tube
  • Using a pair of thin nosed pliers or even your fingers you can simple pull the waste tube free from its socket
  • You then remove the little collar and slot it back into the socket where you won’t lose it.
D92 : Slide tube over to left side
  • You now slide the tube over to the left side where it will be easier to redirect to an external tank.
D92 : Cut tubing
  • To avoid the waste tube crimping or folding so that ink won’t exit properly, I recommend cutting the tube length by about 2 inches…IMPORTANT: If in doubt, don’t cut the tube but do check for any tube folding or similar problems before you complete the installation.
D92 : Attach fitting to waste tube
  • Push the barbed fitting from your OctoInkjet kit into the waste tube
D92 : Modify the case grill to allow the tube out
  • You need to remove one of the grill parts to allow the tube to exit..
    Tip: Remember to remove the lowest part, not one near the top.
D92 : Thread tubing through and attach
D92 : Attach to Barb
  • Pull the tube extension through the new hole
  • Attach it to the barbed fitting on the waste ink tube
D92 : Tube/Fitting in position
  • As you start to put the case back into position, gently pull the extension tube so the barbed fitting is up against the hole.
    Tip: Do not make the hole big enough for the fitting to exit.
    This is a safety feature that stops you accidentally pulling the waste tube off the internal pump.
D92 : Start replacing the case
D92 : Press case down to re-engage tabs
D92 : Replace the screws in the back
  • You can now start to replace the case being careful to avoid the tabs on the rear and making sure the front tabs are also in place.
  • Press down on the case to re-engage the tabs that hold it in place.
    Tip: Check for any loose wires, etc… 
  • Replace the screws in the back of the case when everything is back in position
D92 : All finished
  • This is the finished installation with the OctoInkjet Solo (box) kit installed

Resetting the waste ink counter

Earlier models like the C90 do have a reset utility that will work and I have a very strong suspicion that it may also be possible to use the waste ink reset from this utility on later models like the T10, T20, etc… If anyone tries this and can confirm, that would be much appreciated.

Remember you can use the QuickFind tool to get more information specific to your printer model.

Leave a Reply

This site uses Akismet to reduce spam. Learn how your comment data is processed.